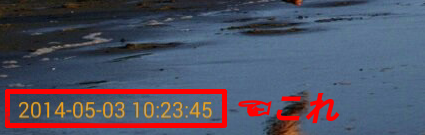
前回RaspberryPiでカメラモジュールを使用して写真を撮る方法を紹介しましたが、この写真にタイムスタンを埋め込みたいと思います。なぜタイムスタンプを埋め込みたいかというと、タイムラプス動画などを作った時にはタイムスタンプが表示されたほうがなんとなく面白みがあるからです。
とりあえず環境としては前回RaspberryPiで写真を撮ったのでそのままRaspberryPi上でタイムスタンプを埋め込みたいと思います。
まずは、Open CVとPILインストールからです。
$ sudo apt-get update
$ sudo apt-get install python-imaging
$ sudo apt-get install libopencv-dev
$ sudo apt-get install python-opencv
続いて、python-image-processingというソフトを使用します。
git clone https://github.com/karaage0703/python-image-processing.git
$ cd python-image-processing
日付の文字にフォントが必要とのことなので、フォントをコピーします
$ cp /usr/share/fonts/truetype/freefont/FreeMono.ttf ./
本来使用するフォント名はデフォルトでArial Black.ttfになっていますが、copyする際に半角スペースが使えませんでしたので、コピー元のフォント名をそのまま使います。
./photo-exif-date-print.pyのフォント名をFreeMono.ttfへ書き換える。
$nano ./photo-exif-date-print.py
./photo-exif-date-print.pyの47行目のArial Black.ttfをFreeMono.ttfへ書き換えます。
# -*- coding: utf-8 -*-
import cv2
import sys
import numpy as np
from PIL import Image, ImageDraw, ImageFont
from PIL.ExifTags import TAGS, GPSTAGS

font_color = (255, 255, 255)

def get_exif(file,field):
    img = Image.open(file)
    exif = img._getexif()

    exif_data = []
    for id, value in exif.items():
        if TAGS.get(id) == field:
            tag = TAGS.get(id, id),value
            exif_data.extend(tag)

    return exif_data

def get_exif_of_image(file):
    im = Image.open(file)

    try:
        exif = im._getexif()
    except AttributeError:
        return {}

    exif_table = {}
    for tag_id, value in exif.items():
        tag = TAGS.get(tag_id, tag_id)
        exif_table[tag] = value

    return exif_table

def get_date_of_image(file):
    exif_table = get_exif_of_image(file)
    return exif_table.get("DateTimeOriginal")

def put_date(file, date):
    base_img_cv2 = cv2.imread(file)

    base_img = Image.open(file).convert('RGBA')
    txt = Image.new('RGB', base_img.size, (0, 0, 0))
    draw = ImageDraw.Draw(txt)
    fnt = ImageFont.truetype('./Arial Black.ttf', size=(int)((base_img.size[0]+base_img.size[1])/100))

    textw, texth = draw.textsize(date, font=fnt)

    draw.text(((base_img.size[0]*0.95 - textw) , (base_img.size[1]*0.95 - texth)),
              date, font=fnt, fill=font_color)

    txt_array = np.array(txt)

    output_img = cv2.addWeighted(base_img_cv2, 1.0, txt_array, 1.0, 0)
    return output_img

if __name__ == '__main__':
    param = sys.argv
    if (len(param) != 2):
        print ("Usage: $ python " + param[0] + " sample.txt")
        quit()

    date = get_date_of_image(param[1])
    output_img = put_date(param[1], date)
    cv2.imwrite('exifdata_' + param[1], output_img)
スポンサード・リンク
一つのファイル、例えばtest.jpegというファイルに日付を埋め込む場合は、以下のようなコマンド。
$ python photo-exif-date-print.py test.jpeg
元の写真はそのままでexifdata_test.jpegという日付挿入された写真ファイルが生成されます。
また、たくさんのファイルを処理したいときは、以下のようなスクリプトを作成します。
#!/bin/bash
for f in *.jpg
do
    python photo-exif-date-print.py $f
done
上記のファイルをexif-print.shという名前で保存し、実行権限を与えます。
$ chmod 755 exif-print.sh
$ ./exif-print.sh
これを実行するカレントフォルダ内の拡張子がjpgの画像に日付が埋め込まれます。
スポンサード・リンク